How To use your new Lumae Skin Handset!
Step #1 - Cleanse
Start your treatment by cleansing your face and removing any makeup from your skin.
Step #2 - Tip Selection
When treating skin, select the tip that works best for you or alternate tips depending on what you would like to achieve! You can use multiple tips per session provided you do not pass over treated areas more than once.
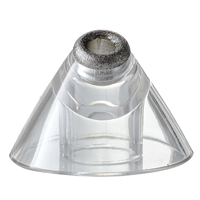
For your First Treatment start with the Microcrystalline Tip

Composed of Microcrystalline particles, this Tip is best for deep exfoliation and removing dull tired skin.
Small Tip

Perfect for focus areas such as the nose and chin. Great for extracting Blackheads / Whiteheads.
Oval Tip

Important Note: This tip has the strongest suction. We recommend this only on the Lowest Level of Suction.
Best for promoting blood circulation and inducing collagen production.
Step #3 - Test Time
Select the Lowest Level of suction and softly glide the handset over the Back of your Hand / Forearm to practice the stroke angle and test the reaction of your skin. 
Allow your skin 5 minutes to settle before continuing as effects are not always immediately visible. Once you have confirmed the treatments are comfortable for your skin, then you are ready to continue! 
Step #4 - Steam It Up
Steam your face with a face steamer OR place a warm towel on your face for 10 minutes. 

This will help relax and open pores, helping you get the best possible results.
Tip: Start with a warm shower to help soften skin. 
Step #5 - Set the Mode
The purpose of Microdermabrasion is to gently polish away the top layer of dead skin cells to reveal and promote new healthy glowing skin. 
The Lumae Skin Microdermabrasion Handset has (4) Levels of Suction.
For your First Treatment start with the Lowest Level of Suction. Most skin types will only ever require this level of suction.
Levels (3) and (4) are dedicated to non-sensitive parts of the body such as the back.
Step #6 - Treat Yourself
Important Before you begin:
Suction should never be strong. Do not apply any pressure whilst using your handset.
Always glide the handset over skin, do not hover on any spots and move swiftly.
After each stroke give your skin time to react as the effects of the device are not always immediately visible.
Do not pass over treated areas more than once.
Do not continue if you feel any pain during the treatment. Pain is a sign that you may have been too harsh. You may have selected a tip or suction level which is not suitable for your skin type, hovered for too long, moved too slow or have made multiple passes on the same area.
Your Skin is Delicate treat it gently!
1) Start with the Lowest Setting.
2) Using your freehand pull skin taut while treating.
3) Begin from the very bottom of your face and make your way upwards.
4) Gently Glide the Handset along the natural lines of the face.
5) Do not apply any pressure when treating.
6) Strokes should be smooth and swift for best results.
7) Find the optimal Angle. This can take some practice, find the angle which continues suction throughout the stroke!
Learn from each treatment and adjust to perfect the treatment for your skin type!
Step #7 - Rejuvenation Time
Finish up your facial by rinsing your face with cold water and holding a cold towel to your face.
The chill will help tighten your purified pores and reduce re-clogging.
Be sure to moisturise after each Microdermabrasion treatment to leave your skin hydrated, glowing and selfie-ready! 
After your first treatment wait at least 7 days Or longer, if you feel your skin is still regenerating, before your next treatment.
Handset Maintenance
Cleaning Your Handset
After Each Use be sure to remove the Suction Tip from the Microdermabrasion Handset and thoroughly clean it using warm soapy water and finishing with an alcohol based disinfectant.
Hard to reach areas can be cleaned using cotton earbuds OR a small soft brush.
This will prevent bacteria build up and prolong the life of the Suction Tips.
Charging Your Handset
To charge your handset, simply insert the small USB tip into the bottom of the Lumae Skin Microdermabrasion Handset then insert the large USB into either a Smart Phone / Tablet Charger, Laptop or Computer. 
A RED flashing light will appear once you connect the device, this indicates that your handset is charging.
Once fully charged this light will turn solid BLUE. 
Charging time can usually take anywhere between 2-3 hours.
HOW TO Video Coming Soon


